Saturday 19 December 2009

Bad Wrinkles on the Round Printing

.

After a few days, bad wrinkles appear on the round printing, see above. [Click to see a larger image]. Possibly the spray adhesive shrinks when it dries causing these wrinkles.

Sigh! Possibly this problem cannot be remidied.
.

Monday 14 December 2009

My Round Printing is now Mounted

.
I've now got an extra pair of hands to help me, and have now glued the printing on to my round mounting board. The mounted printing can now be placed on the pivot at the floor stand and can be rotated, see below.


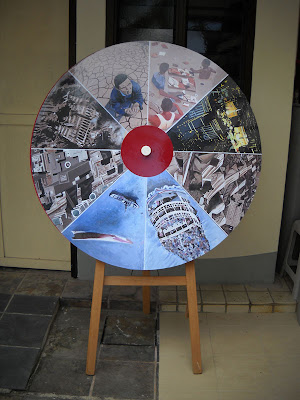
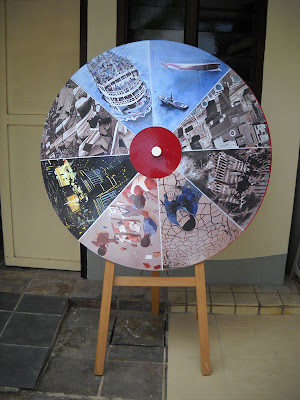
This looks all right from afar. But on detailed inspection later, defects can be found.

Firstly, the printing is slightly off centre. This causes a narrow red rim to be seen at about 1/3 of the circumference. Secondly, narrow wrinkles can be seen. These two cannot be remedied.

Thirdly when lights are right in front, it can be seen the surface is not flat. This means on display, lights have to be from the top, not in front.

Fourthly, some parts of the edge are spayed. I have now put masking tapes around the edge, in case the glue is still tacky and will set tight later.

Anyway, on this point, I intend to add a rim around the edge later on. Currently I am testing different types of rubber hose as the rim. A 1/2-in. hose is of suitable size. My neighbour hardware shops (stores) sell this size, but only the soft transparent type for acquariums. This is not suitable. I also have a sample of 1/2-in. hose that is nearly white. The color is all right, but this is a bit too stiff to be easily installed. I'll have to continue to work on this problem.
.

Things I can do in an Art Blog

.
This Art Blog is relatively new. Even writing a Blog is also new to me. I started it partly to get familiar with its nature and features, and with the things I can do in it.

One of them is to explain and show my work in progress (WIP). The final picture of my art can then be shown in my Art Website.

Another is to do some thinking aloud while working on my art, especially any artwork that is complex and require much thinking.

I'll elaborate on this thinking aloud. I have been taking part in online art forums, one of them which I go in more often is the Artspan forum.

Recently in this Artspan forum, I have been doing quite a bit of thinking aloud about planning and pursuing the works on my art. Talking aloud about my thinking process on my art is of benefit to me. It helps me think more clearly, and modifying the things that do not seem right. But actually an online forum is not a suitable platform for this type of talk.

On the other hand, an Art Blog seems a better place for this type of mainly one-directional talks. Thus it is likely that I am going to do more in this Art Blog.
.

Mounting Board for this Round Printing

Continuing on the task in the earlier post, I've found a spare 4 x 4 ft foam PVC plastics board of suitable 10-mm thickness. With my portable jigsaw, I carefully sawed the circular profile with a diam slightly smaller than that of the printing. A central pivot hole is then drilled.

This round board is sufficiently stiff, and not too heavy. It's round shape makes it sligly awkward for one person to move it around. But fingers can be slipped into the central pivot hole to help with this task.

I then got a short pvc pipe for the central pivot and mounted it on my wooden A-shapes floor stand.

The arrangement shown below in my workshop is now ready for the gluing operation.


For this gluing, I plan to use spray adhesive. But I need to buy a new can as what I have now is a bit old and not working well.

But then, one thing bothers me. The circular edge needs to be framed to avoid the edge spaying. Frame materials in frame shops are all straight. This frame material has to be flexible to make it follow the circular profile. A split rubber hose is not the best frame, but there seems to be no other choice.

A Printing of my Round Painting

.
I am working on this task now.

At my recent painting exhibition, there was a backdrop with a large printing of my round painting "Our Upside Down World". After the exhibition, I took this printing sheet back and looked at it recently. It is a 4-ft diameter glossy printing.

The original painting of this, shown at an earlier post, is of size 6 x 6 ft, built up from four 3 x 3 ft painted canvases. At the exhibition, the assembly was hung faced down below the hall ceiling for viewers to stand underneath to look up at it. Also viewers had to bodily rotate themselves to see the eight paintings in the right direction. Hanging this painting under the ceiling was a difficult operation that required a few men.


Now that I have this slightly smaller quality printing, I decided to do something about it. I'd mount this on a 4-ft diam round board and pivot it at the centre. This means it can be rotated when hung up on a wall.

Thus viewers can stand in front and view the eight scenes at the right alignment when the printing is rotated.

Now I have to think through how to make a 4-ft diam mounting board and glue this round printing at the exact position on it. For this, I'd make a central pivot hole on each of them and rely on these two holes to guide me while gluing the two items together at the correct position.
.

Followers

About Me

My photo
Singapore, Singapore
I was born 1940 in Hong Kong.. After my first degree there, I left for training in England and continued with further studies and research at the Imperial College, London obtaining a PhD.. Since then I came to Singapore for an academic career.. I have now retired, take on a new passion and am active as an artist, doing sculptures, installations and oil paintings.. I was sponsored twice to present solo art exhibitions in Singapore, in 2007 and 2009. You can see my art website www.onesunartist.com.. I have since reinvent myself to take up writing, self-publishing 3 books.